
How to Manage 20+ GitHub Repos Without Losing Your Mind
Managing 20+ GitHub repositories can feel overwhelming, but with the right strategies, you can regain control and reduce mental strain. Here's what you need to know:
- Organize Repos: Use clear naming conventions, GitHub Topics, and labels to make repositories easy to navigate.
- Standardize Setup: Create repository templates with pre-configured folder structures, workflows, and key files like
README.mdandLICENSE. - Centralize Tracking: Use GitHub Projects or external dashboards to consolidate issues, pull requests, and updates in one place.
- Automate Tasks: Leverage GitHub Actions to handle repetitive tasks like testing, dependency updates, and CI/CD workflows.
- Maintain Health: Schedule regular maintenance for dependency updates, security scans, and repository optimization.
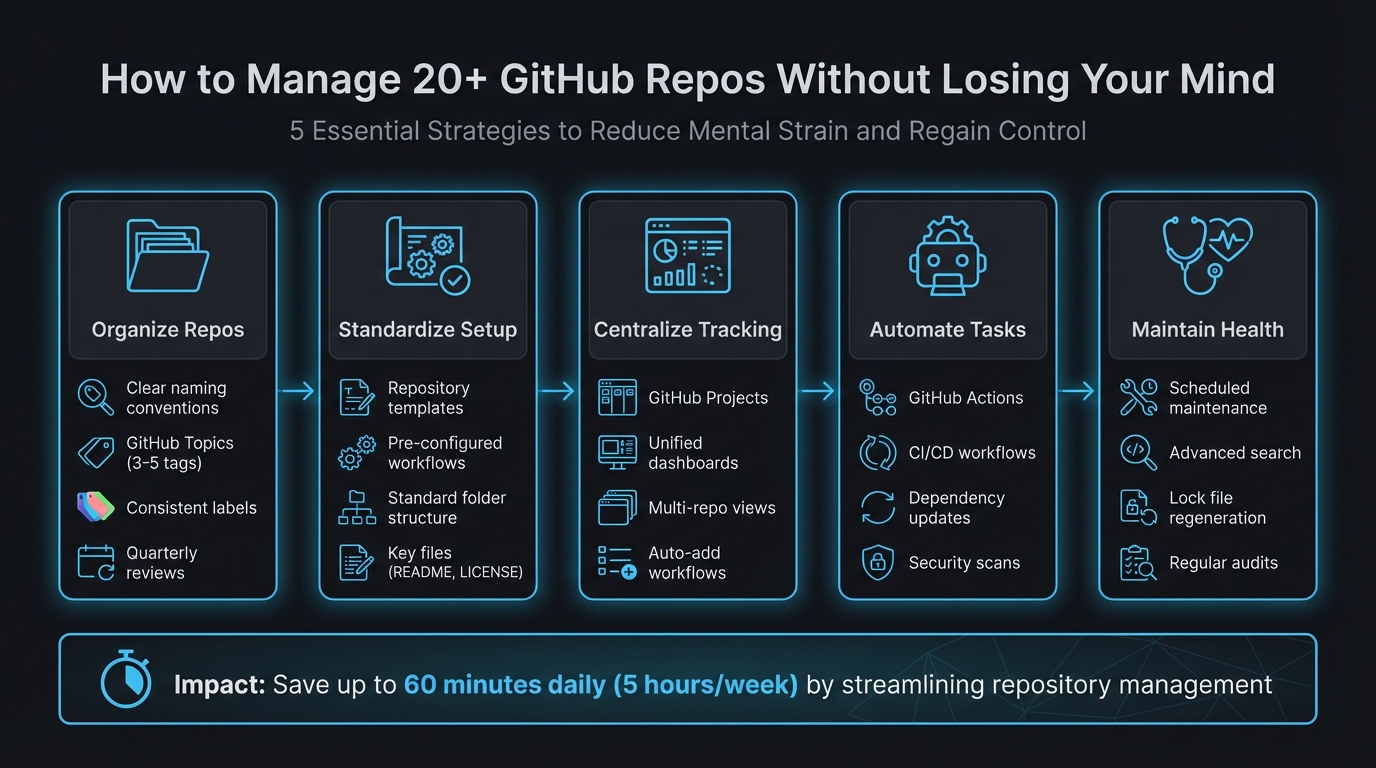
5-Step Framework for Managing 20+ GitHub Repositories
Script updates across multiple GitHub repositories with Octoherd
sbb-itb-5b9029c
Organize Your Repositories for Easy Navigation
Managing 20+ repositories can get messy fast. To keep things manageable, make sure every repository is easy to identify at a glance. Start by using clear naming conventions that group related projects logically. For example, names like client-acme-api, client-acme-frontend, and client-acme-docs immediately show they belong to the same project family. Stick to lowercase letters and separate words with dashes - this improves readability and ensures compatibility with URLs [4][5].
GitHub Topics are another handy tool - they work like hashtags for your repositories. Add 3–5 relevant tags to each repo, such as react, production, or microservice. This makes it simple to filter and find projects using GitHub's search bar [9]. Combine this with consistent labels (like type:bug or priority:high) across all repositories to streamline cross-repo tracking. Tools like github-label-sync can automate label management, ensuring uniformity across your projects [6].
"A clean repository isn't just a nice-to-have - it's a force multiplier for collaboration, automation, and long-term maintainability." - Esteban Garcia [6]
Avoid common mistakes: Don’t include version numbers in your repo names - use Git tags for that instead. Skip personal pronouns like "my" or "mine" to promote team collaboration [4][5]. Conduct a quarterly review to ensure your naming conventions and topics still align with your evolving projects [9]. And remember, clear organization isn't just about aesthetics - it can cut developer onboarding time in half [8][9]. Once your repos are well-organized, focus on standardizing naming conventions and metadata.
Create Consistent Naming Conventions and Metadata
Standardized naming conventions save time and reduce confusion. When every repository follows a consistent format, there’s no need to decipher names - you can dive straight into the work. A format like [category]-[project]-[type] (e.g., web-shop-api or mobile-shop-ios) creates instant clarity and logical grouping [9]. Keep names concise (3–5 words max) yet descriptive enough for newcomers to understand their purpose [4][5].
Metadata takes this organization to the next level. Use GitHub Topics to categorize repositories by tech stack (typescript, aws), purpose (internal-tool, client-facing), or deployment status (production, experimental) [9]. Stick to a consistent set of topics across all repos to maintain clarity [9]. For team-wide consistency, create a centralized .github repository at the root of your organization. This can house default files like CONTRIBUTING.md and CODE_OF_CONDUCT.md, which automatically apply to repos that don’t have their own [7]. This approach reduces repetitive work while ensuring uniformity across projects. Once your naming and metadata are standardized, templates can further simplify your workflow.
Use Repository Templates for Standardization
Repository templates make starting new projects a breeze. They include standard folder structures (src/, test/, docs/), essential configuration files (.gitignore, CODEOWNERS), and predefined GitHub Actions workflows for CI/CD [7]. Marking a repository as a template allows anyone to create a new project from it with a clean commit history [7].
"Templates turn 'vibes and tribal knowledge' into predictable, repeatable operations. The result is fewer questions, faster reviews, tighter security compliance, and contributor experiences that actually scale." - Maria, Everhour [7]
Create a "golden" starter template that includes key files like LICENSE, SECURITY.md, and community guidelines (CONTRIBUTING.md). Add reusable workflows in .github/workflows/ for builds and security scans [7]. To streamline issue reporting and code reviews, store multiple issue and PR templates in .github/ISSUE_TEMPLATE/ [7]. A well-crafted README in your template can answer most questions new contributors might have before they even ask [7]. Use semantic versioning (e.g., v1.2.0) and maintain a changelog for your templates so teams can easily track updates [7]. By simplifying setup and reducing decision fatigue, templates ensure consistency across all repositories while keeping multi-repo management stress-free.
Centralize Project Tracking Across Repositories
Switching between 20+ repositories to check issue statuses, review pull requests, or track progress can drain productivity and make it tough to see the bigger picture. Instead of juggling multiple browser tabs or tools, imagine having a single view that consolidates all your projects. That’s the key to staying organized and efficient.
Tools like GitHub Projects and external dashboards can pull together issues, pull requests, and updates from multiple repositories into one place. Take the Grafana Alerting team at Grafana Labs as an example. Managing nearly 1,000 repositories, they streamlined their workflow by consolidating everything into a single GitHub Project board. Senior Engineering Manager Armand Grillet introduced custom fields like "Status", "Quarter", and "Escalation", while GitHub Actions automatically routed support escalations into the project. The result? Their average open escalation count dropped from 20 to just 4 [13].
"Opening the project and seeing that new relevant issues have been added automatically, ready for triage, feels like magic."
- Armand Grillet, Senior Engineering Manager, Grafana Labs [13]
When you’re dealing with a growing number of repositories, manually updating everything becomes impractical. Automating workflows to pull in issues and pull requests based on labels or repository origin ensures your dashboard stays updated with minimal effort. This way, you can spend less time searching for information and more time shipping code. Here’s how you can centralize tracking effectively.
Set Up GitHub Project Boards for Multi-Repo Tracking
GitHub Projects act as a central hub, bringing together issues and pull requests from across your organization. By automating the process, you can reduce manual tasks and minimize context switching. Use the "auto-add" workflow to automatically capture new items that meet specific criteria - like issues labeled bug or pull requests assigned to you. For larger setups, where more than five repositories need to be tracked, you can use the actions/add-to-github-projects GitHub Action to bypass the default limit [10].
For organizations managing a large number of repositories, consider scheduling a GitHub Action to search for new issues across all repositories and add them to your central project using the GraphQL API [10]. Keep in mind the 1,200-item limit per project, and regularly archive completed items to maintain smooth performance [10].
The table view feature allows you to bulk-edit metadata like status or priority across items from different repositories [11]. You can also create tailored views within one project, such as a "Management View" for high-level overviews and a "Developer View" for specific task assignments. Filters like repo:OWNER/REPO help focus on particular repositories, while assignee:@me shows only your tasks. Want to track recent updates? Use updated:>@today-7d to display items updated in the last week [10].
While GitHub Projects are excellent for structured tracking, unified dashboards provide a simpler way to get a quick overview.
Use a Unified Dashboard for Multi-Repo Management
GitHub Projects work well for long-term planning, but they rely on consistent workflows and labeling across teams. If your team works asynchronously or uses varied organizational methods, external dashboards can provide real-time visibility without the need for manual updates. Tools like Repo Dashboard automatically gather all issues, pull requests, and branches across your organization into an easy-to-read three-column view [12].
"GitHub Projects is great for planning and tracking work over time, but it relies on everyone in your organization following specific workflows consistently... Repo Dashboard takes a different approach: it automatically fetches all issues, PRs, and branches without anyone needing to follow any specific workflow."
- Alberto Roura, Developer [12]
Unlike project boards, dashboards eliminate the need for constant upkeep. Without configuring workflows or relying on team members to update tasks, a unified dashboard aggregates data automatically. This is especially helpful for indie developers or smaller teams who need quick, hassle-free visibility. It’s a straightforward way to streamline tracking and speed up delivery.
Automate Repetitive Tasks Across Repositories
Managing dozens of repositories can quickly turn into a grind, with tasks like testing, updating dependencies, running security scans, and handling deployments piling up. Automation is your best friend here - it frees you from these repetitive chores so you can focus on creating new features.
GitHub Actions is a powerful tool for automating these tasks. By creating shared workflows in a centralized .github repository and leveraging the workflow_call trigger, you can define processes once and reuse them across all your repositories. For example, thoughtbot uses this approach to update workflow logic in a single location, allowing changes to propagate seamlessly across their projects.
You can also use cross-repository triggers to streamline workflows. The repository_dispatch event, for instance, can initiate integration tests in dependent services. One team managing 134 packages across three monorepos implemented a "Rolling PR" system using repository_dispatch. This setup notifies a central integration hub, which automates end-to-end testing and merges submodule updates [16].
"Run less, not faster. Affected-only execution is the biggest lever. Running 4 packages instead of 45 beats any caching optimization."
When working with CI/CD pipelines across multiple repositories, every second counts. Tools like Turborepo or Nx help by identifying which packages have changed and running jobs only for those components and their dependents. This "affected-only execution" approach can slash CI jobs from 90 down to as few as 8 per pull request. For teams handling 50 pull requests daily, this could save over 20 hours of CI time, thanks to an 80% remote cache hit rate [15]. These strategies not only lighten the CI load but also speed up deployments.
Set Up GitHub Actions for Common Workflows
You can simplify routine tasks like testing, linting, building, and deploying by defining them once with workflow_call. These workflows can then be triggered from any repository. Automating triage tasks with tools like actions/labeler and actions/stale also minimizes the need for manual intervention.
For cross-repository workflows, consider using fine-grained personal access tokens instead of the default GITHUB_TOKEN, which is limited to a single repository. If you're managing a large portfolio of repositories, a matrix strategy can help you efficiently iterate over a list of repository names.
Unified tools like super-linter, which runs multiple linters in one go, can save time and ensure consistency. Add-ons like action-slack-notify and release-changelog-builder keep your team updated with real-time build statuses and automated release notes.
Automate Dependency Updates and Security Scans
Just as workflows can be automated, so can dependency and security management. Keeping dependencies up-to-date not only improves performance but also reduces security risks. Nawaz Dhandala from OneUptime puts it bluntly:
"Outdated dependencies are security vulnerabilities waiting to happen. Automation keeps them fresh without manual effort."
- Nawaz Dhandala, Author, OneUptime [14]
Schedule regular security audits using tools like npm audit to run every six hours. This ensures critical issues are identified and patched promptly. It's worth noting that around 50% of developers only update dependencies when they run into a bug, even though over 180,000 vulnerabilities have been reported in open-source libraries over the years [17].
To handle high volumes of updates, automate the merging of dependency pull requests. Instead of deploying dozens of individual changes, group multiple non-breaking updates into a single feature branch for unified testing [2]. If a pull request requires a rebase, hold off until the current batch of updates has been merged into the main branch - this often resolves conflicts or makes them easier to handle [2].
For consistency, schedule a weekly workflow to regenerate lock files (like package-lock.json). This helps resolve conflicts, clean up orphaned dependencies, and keep your repositories in sync [14]. In multi-repository setups, a central tracking repository can aggregate issues and status updates from all component repositories using cross-repository GitHub Actions, giving you a clear, integrated view [18].
Keep Repositories Healthy Over Time
While automation can take care of daily tasks, maintaining long-term repository health requires consistent upkeep. Without regular attention, repositories can pile up technical debt, outdated dependencies, and performance problems that eventually bog down your workflows. The trick is to incorporate maintenance into your routine before these issues spiral out of control.
Schedule Regular Maintenance Tasks
Make scheduled maintenance tasks a regular part of your process, ideally during off-peak hours to avoid disrupting development. With tools like GitHub Actions, you can use cron scheduling to automate these tasks. For instance, the git maintenance command helps with repacking objects, performing garbage collection, and updating commit graphs. Set these tasks to run during low-traffic times - such as Sundays at 5:00 AM (0 5 * * 0) - to keep repositories optimized without impacting your team’s productivity [19].
In January 2024, GitHub's Open Source Program Office introduced the Evergreen GitHub Action, a tool designed to streamline dependency management. By deploying Evergreen across their internal repositories, they discovered numerous private repos lacking automated dependency updates. The tool stepped in to enable updates and created pull requests with the necessary configurations, ensuring all repositories followed consistent standards [20].
You can also reuse auto-merge settings from dependency updates to handle low-risk changes automatically. Regularly regenerating lock files helps resolve conflicts and eliminate orphaned dependencies. These automated tasks create a solid foundation for repository clarity, which advanced search tools can further enhance.
Use GitHub's Advanced Search to Find Information Fast
Scheduled maintenance is just one piece of the puzzle. GitHub's advanced search capabilities can help you quickly identify issues or outdated code across your repositories. If you're managing 20 or more repositories, manually combing through each one isn’t practical. Instead, advanced search allows you to scan your entire organization in seconds. By using search qualifiers, you can pinpoint exactly what you’re looking for. For example, org:your-org pushed:<2025-03-13 helps you find repositories with no activity in over a year, while is:pr state:open status:failure highlights pull requests with failing CI/CD checks [21].
| Maintenance Goal | Search Qualifier Example | Purpose |
|---|---|---|
| Identify Stale Repos | org:my-org pushed:<2025-09-01 |
Finds repos with no commits for 6+ months |
| Find Broken Builds | is:pr state:open status:failure |
Locates pull requests with failing CI/CD |
| Audit Dependencies | filename:package.json "react": "<18.0.0" |
Flags repos using outdated major versions |
| Unassigned Bugs | is:issue is:open label:bug no:assignee |
Surfaces bugs that no one is working on |
To stay ahead of potential issues, save your most-used searches and enable notifications. This way, you'll be alerted to bottlenecks without needing constant manual checks. You can also search for specific files combined with keywords - like filename:.env api_key to spot accidentally committed credentials or filename:package.json dependencies to review dependency versions across projects. These targeted searches turn repository maintenance into a streamlined, efficient process, saving your team time and effort in the long run.
Conclusion: Managing Multiple Repos Without the Chaos
Handling 20+ GitHub repositories doesn't have to feel overwhelming. By using consistent naming conventions, repository templates, centralized project tracking, automated workflows, and scheduled maintenance, you can significantly cut down on the mental load that often comes with managing multiple repositories. Take DNSimple's engineering team, for example: after shifting to Infrastructure as Code to manage over 200 repositories, they were able to update pull request templates across the entire organization with just one line of code [22]. This demonstrates how standardization can simplify even the most complex setups.
"Structure is kindness. Every folder name and issue template is a small act of care for the next person who shows up." - Marcus Bennett, Author, Git-Hub Magazine [3]
Streamlining these processes can save developers up to 60 minutes a day - or 5 hours a week - by reducing the time spent triaging notifications and tracking work across repositories [1]. That’s time better spent building features instead of digging through endless browser tabs or trying to recall where a crucial configuration file is stored.
These practices help maintain clarity and project comprehension. Advanced search tools allow you to find what you need across repositories in an instant, automation takes care of repetitive tasks, and centralized tracking ensures you have a clear view of everything without the mental juggling. This way, you can dedicate your energy to solving actual problems - not just figuring out where they’re hiding.
FAQs
When should I keep separate repos vs use a monorepo?
When deciding between separate repositories and a monorepo, the right choice often depends on factors like your project’s size, team dynamics, and workflow preferences.
A monorepo offers a unified environment, making it easier to manage dependencies and share code across related projects. It’s particularly useful when teams frequently collaborate or when projects are tightly connected.
On the other hand, separate repositories provide more autonomy. They allow for independent releases, more granular access control, and can reduce overall complexity for smaller, standalone projects.
However, there are tradeoffs. Monorepos can face scaling challenges as they grow, while separate repos might lead to coordination overhead when managing shared resources. Ultimately, the decision should align with your team’s workflow and the complexity of your projects.
What’s the simplest way to get one view of issues and PRs across all repos?
The easiest approach is to use a dashboard tool that brings together issues and pull requests from multiple repositories. For example, Repo Dashboard offers a local-first interface where you can see issues, PRs, and branch activity all in one place. Another option is automating data collection into GitHub Projects, which lets you create a unified project board directly within GitHub to track issues and PRs across various repositories.
How do I reuse the same GitHub Actions workflows across multiple repos?
To simplify your CI/CD setup across multiple repositories, you can create reusable workflows using the workflow_call trigger. Here's how it works:
- Define the Reusable Workflow: Set up the workflow in a single repository.
- Call the Workflow: Use the
useskeyword in other repositories to reference the reusable workflow. - Handle Permissions: For private repositories, ensure you’ve configured the necessary permissions to access the workflow.
This approach helps centralize your processes, cuts down on repetitive configurations, and makes managing multiple repositories much easier.


